
Mao Mao: Heroes of Pure Heart
Date: December 2022 Format: DVD Type: Series
Here begins my hobby of homemade DVDs. This blog will go through my personal journey of making these DVDs. So expect a long page. I don't have a great memory, and these events happened almost a year ago, so my recollection of exactly how things played out is a bit foggy, but I'll try to remember how things went as accurately as possible. But feel free to skip all the begarble and just look at the pictures if you just want to see what I made and don't want to read. I won't be offended n_e
While I go in depth my process, this is not a tutorial. This blog does not exclude mistakes I've made, nor go over better approaches I learn about after this project. If you want a proper step by step guide on how I make DVDs, let me know your interest in the guestbook or comment here (or wherever else you can manage to contact me) and I might make a guide in the future. Though keep in mind I still have a lot to learn. This is still a new hobby for me, and I'm just working things out as I go.

I guess I could say that my pathway into making DVDs started some years ago, when I got a subtitle only copy of Children of the Whales (which will be reviewed later). Long story short, I was shocked and appauled at the quality of the disc--especially the menu. It was bare bones, in the wrong aspect ratio, and the menu buttons were CRISPY as hell. It was so bad, I had two thoughts. 1) While this show isn't amazing, it most certianly deserves something MUCH better than this for a physical release. And 2) I bet even I could do something better than that.
Fast forward some time later, we move on to another show that has nothing to do with Mao Mao. I had recently finished binging Rise of the Teenage Mutant Ninja Turtles, and I was HOOKED. It instantly became one of my all time favourite shows. And with all movies and animated series I loved or cared about, I simply had to have a physical copy of it somewhere in my collection, so I set into looking around for a DVD or BluRay copy. I managed to find a copy, and at first I was surprised and delighted to find it was so cheap. But my delight quickly diminished as I realised that the reason it was so cheap was because it wasn't a complete series disc, but a disc that only held 5 episodes of the show--and 5 random episodes at that.
Despite my disappointment, I got the DVD anyway. I would take anything. It's a little hard to remember since this happened about a year ago, but I'm pretty sure I was half expecting something not very grandiose. I had a different BluRay copy from Nickelodeon/Paramount in my collection from earlier, so I already knew their physical releases are... simple, so I was half prepared for what I would find. I'll give a more in depth review some other time, but for a shortened version: while the graphics were pretty decent, they were still very limited, and there was no disc art, as per Paramount fashion.
Rottmnt deserved much better than this. Not only that, but they didn't even have the complete series available, only a couple of discs with a couple of random episodes slapped on. Finally the thought popped in my head: "If they're not going to make a physical release of this beloved series, I will!"
Chapter 1: Starting Out
Step 1: Deciding on what to make. I didn't want to start with rottmnt, as I wanted that copy to be well made, and knew my first attempts would be a little rocky as I learned how to do things. So picking something else to start out was the way to go--something not quite as dear to me, but something I still wanted in my collection but didn't have an official physical release of it's own. Which finally brought me to the idea of giving Mao Mao: Heroes of Pure Heart a homemade physical release! With step one out of the way, that brought me to
Step 2: Writable discs. First I had to familiarize myself with what DVDs had the ability to be written on, and any other information I might need to know about the discs themselves. Long story short, you have 2 main types of DVDs, and 2 DVD sizes. You have DVD+R, and DVD-R.
The difference between the two is +R is the newer version and is less prone to errors (better against scratches and such.) And -R can play on any DVD player no matter how old it is.
The two sizes you can get is the normal size of 4.7GB, and you have DL (Duel Layer) that can hold 8.5GB of data.
I would also need a plain white disc since I was planning on getting these printed on properly. None of this stickers stuff. With this information, I got DVD+R DL Printable discs. The company I got for this project was Ritek.
After that, I knew I would need a DVD driver that could burn onto these discs. I bought myself a cheap USB writable DVD drive. If you plan on making DVDs at home, make sure the driver is WRITABLE. Not every driver will have this function.
Step 3: Finding a program to make dvd menus. There's a lot of programs out there for this, and most of them are garbage--at least, most of the free ones. There are a few paid ones out there, but the tried at true ones are very expensive, and likely meant for big companies, not hobbiests like myself. It took a fair bit of trail and error and hoping I didn't download any viruses with all of the different programs I was downloading and trying out.
A lot of these menu creators were very bare bones. Most of them required you to use premade menus, or something very simple. This would be fine if you just wanted something to put your videos on, but I wanted to make art, and I needed a certain amount of freedom. And that's when I finally landed on,
Chapter 2: DVDStyler 
DVDStyler is simple, but complex enough to let me do most of what I want to do, while also being relatively user friendly (you'd be surprised how un-user friendly a lot of the other programs were, even though they offered less freedom in design.)
I could make my own menus without having to use a template, I could add music, video (which I would figure out how to use later) I could put buttons where I wanted them, I could make other title screens for scene selects and whatever else I would want, and I can easily code the directory in the buttons.
The only main limitation with DVDStyle is that you can only use a selection of premade buttons. Or rather, they don't allow you to import your own custom buttons in a simple and accessible way. It would be nice to have a custom framing button, or a custom selection image, but I just cannot figure out how to do that yet. But DVDStyler does everything else quite well, and the buttons it does provide allows me to achieve what I need. I messed around and familiarized myself with how the program worked
Chapter 3: Art
Now it was time to get into the fun stuff, designing how the physical media would look.
Part 1: Menu. I started off with a rather simple, still image menu. I don't remember if I knew how to add video to the main menu yet, but either way, I wanted to start simple while I learned things. A simple still image was probably the best way to start out. First was the background. While it would be great to draw everything from scratch and make everything look exactly the way I wanted to, 1) my artistic talent is.. limited. And 2) I wasn't ready to go through the stress and the time needed to draw something from scratch. So I start with a mish mash of images I cut up and paste them together, and edited a little in hopes that they would look somewhat coherent with the background. I think the background image turned out pretty decently.
Next was the header. Originally I had invisioned the header boarder to look like the crystal heart, but like I mentioned before, my artistic talent is limited, and my graphical talent is arguably even worse. I did give it a try, but it did not look at all how I pictured it in my head, and it just did not look very good. I abandoned the idea and went with just plain borders. My final creation definitely has a bit of a homemade feel to it. That said, I think it came out decently enough, especially for a first project.
A phrase I like to repeate to myself to stop being too critical of my work is: "Well, it's still better than a lot of other DVDs out there." And that makes me feel a little better.
I applied the menu "button" text directly onto the image, and in DVDStyler I made invisible buttons that were underlined when hovered over and change colour upon selection. You can put in text buttons in DVDStyler, and I will in later projects, but you can only style them so much. Since my menu was already quite plain, I wanted the buttons to have a little more personality to them, with gradients and drop shadows, etc., hence why I opted to have them embeded in the JPG image.
Originally I wanted to have a crystal heart image indicate the selection, but like I said before, DVDStyler buttons are limited, and I wasn't able to get this to work. So underlines it was.
Finally I added some background music. While I don't typically like having the opening song playing on the menu screen, I don't think I was very happy with my selection of soundtrack songs at the time, and ended up just going for an instrumental version of the OP to play in the Main Menu.
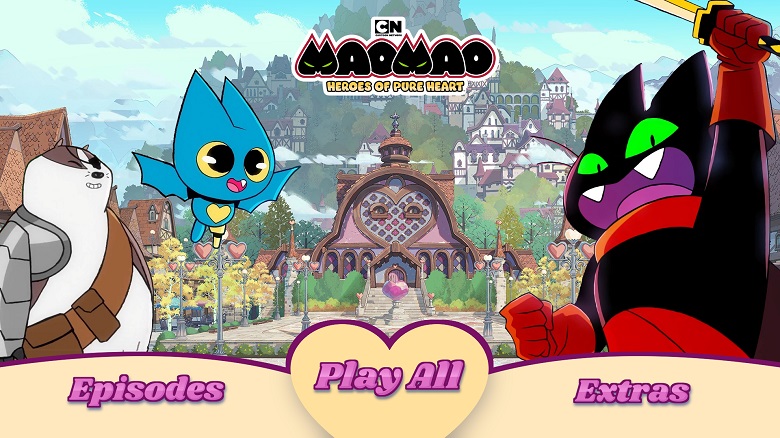
Next was the scene selection menu! I didn't do anything fancy for the background. I simply found some official background art and plopped that on. Also I don't play music on title screens outside of the main menu. You usually don't dwindle on other menus for too long, and the music doesn't carry over to other title screens (I think they can do this on Blu Ray, but I can't achieve this for DVD, or with DVDStyler,) so there would be a lot of stop-start music flicking through titles if you were to go in this direction. So silence it was.
Most of the work done here was for the buttons. DVDStyler gives you framing buttons that will show an image of the video you've linked it to. Alternatively I think you can put in a custom image, if you so desired, but I liked having a preview of the episode you're about to watch. I had not yet learned you can also select what part of the video it takes the preview image from, so I just settled with whatever it automatically supplied me with.
Then some episode titles were added under each preview button, and navigation buttons, which were again buttons that had to be supplied through DVDStyler, so I can't do anything too creative with those either--not that I would at this point so early in time.
I will also mention I added chapters to each episode so that you can skip the opening song if you desired to. Always have a skip option for your opening songs :) The OP is great, but I don't really want to hear it again every 10 minutes for the 30th time.
And finally the bonus features title is more of the same. There's not much new to say about it. A simple background, and some text, which I used the same process as before to have underlined to show selection. Nothing exciting. I added a couple of videos I found on youtube; the original teaser animation/animatic, and the "Season 2 reveal!" animation that was a complete and utter lie. But content is content, so it's been added to the extra features.
The content had to be stretched over two discs, so I saved a new file with the second half of the content, using the same menu layouts.

And that finally does it for the menu! Shove your DVD DL in your writable dvd driver and smack the burn button. It worked like a charm (oh how simple it seemed. More on THAT in the next project...)
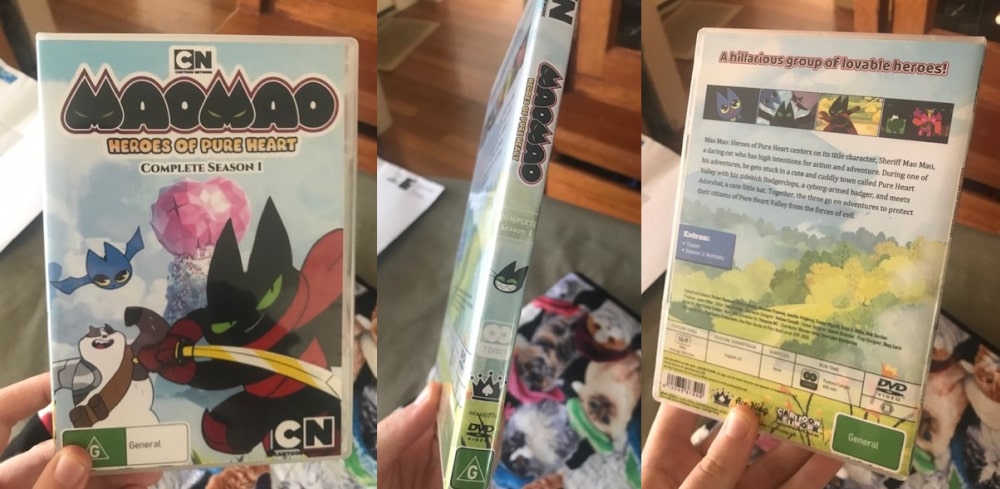
Part 2: Case Art. To start, you want the dimentions to be correct, which can differ depending on the case you want to put this in. Now that I've made my dvds, I knew I needed a 2 disc case. I bought one off ebay that claimed to have a really effective button. However, I realised I made a mistake in buying a "slim" case, which is not what I was after. Plus I tried out the button these people used and I wasn't huge on it. Granted, due to the slim design of the case, it's possible the button is longer in commonly sized cases and works better there compared to the thinner button that I got for the slim case. I don't have this type of button documented in my Push Buttons page at the time of writing this. I use this case to temporarily hold discs for me while I work on them now, but I had to get a replacement.
I tried a different seller on ebay and got another clear 2-disc case with a more standard size, that had a Target-Lite button that has a descent travel on it, making good grip and easy removal. Some careful measuring later (which I ended up getting wrong and having to alter the cover art a little, later on) I got started on the cover.
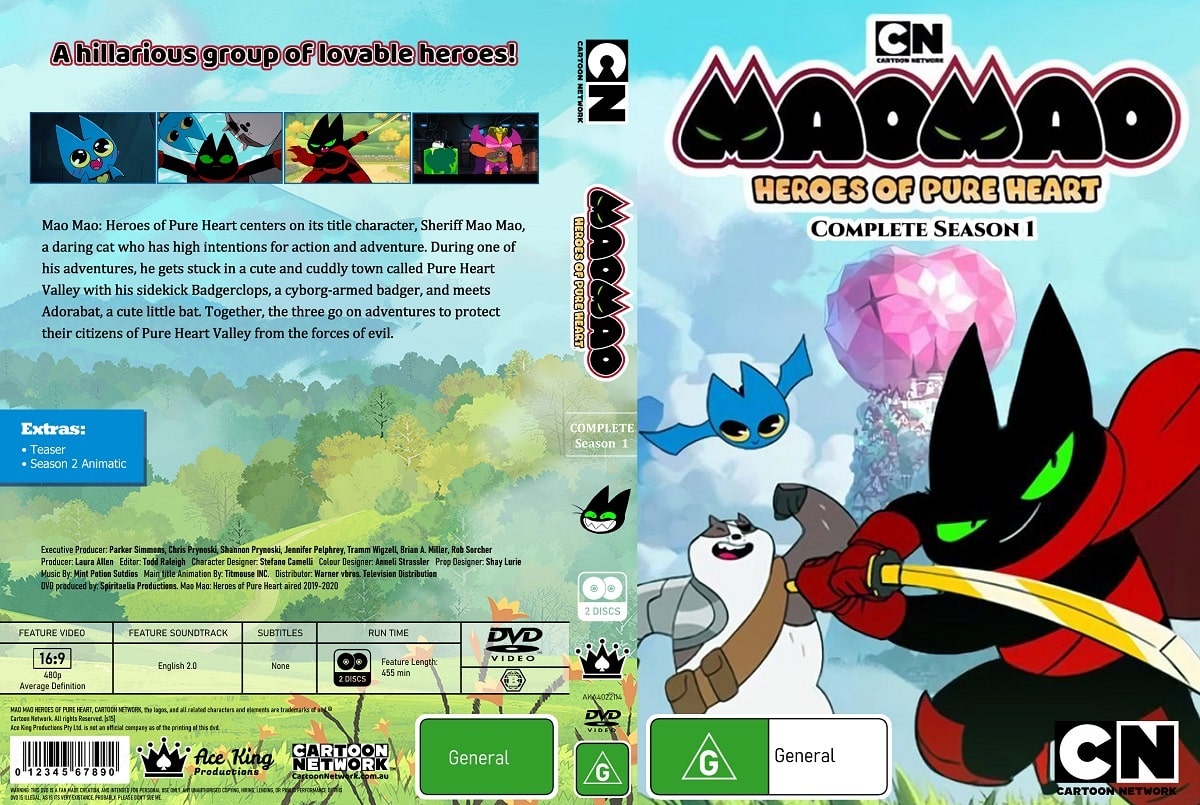
I really wanted to hone in on the details and make this look like an official release at first glance. I spent a lot of time staring at the back covers of other DVDs to see how they presented their information, where they put the logos, what fonts they used, etc. I found the process sort of relaxing, in a way. I even added a fake barcode.
![]() During this process, I realised I should make my own mock distributor production company, like Madman or Paramount, etc. I played around with the idea for a bit, tried a few logos and got some feedback from a friend, and finally came up with my mock company: AceKing, the logo being a crown with a Spade symbol inside it. It's simple and works as a black and white design. With this created, I put it in place of where the destributor companies would usually place their logos. Something about having my own logo just made it feel even more official, and it's nice putting your 'signature' on a product you worked on.
During this process, I realised I should make my own mock distributor production company, like Madman or Paramount, etc. I played around with the idea for a bit, tried a few logos and got some feedback from a friend, and finally came up with my mock company: AceKing, the logo being a crown with a Spade symbol inside it. It's simple and works as a black and white design. With this created, I put it in place of where the destributor companies would usually place their logos. Something about having my own logo just made it feel even more official, and it's nice putting your 'signature' on a product you worked on.
And to finish it off in terms of official design, I noticed most physical releases have a product code stamped on the spine of the case, and the disc art. There were a couple details I noticed. Most product codes started with letters, which often looked like they indicated the distributor's company. Like MM for madman. Then there was also a number commonly found throughout the distributors product codes. I'm not sure what this number indicates. Maybe it's for the type of media it is, such as DVD, Animated, or something along those lines. For my product code I wrote AKA4022114. AKA stands for Ace King, Animation. The 4 is a nonsensical number. But the 022114 indicates the date of MaoMao's release, or more specifically in this case, the date the Pilot released: Februrary the 21st, 2014. I don't know why I put the month first. I guess I did a brain fart and just copied what it said on the wiki rather than using DD-MM-YY.
Finally we get to the art of the cover. My only real regret is that the front cover poster art is such low quality, but I think that was the best I was able to find at the time, and slapped on a "Complete Season 1" subtitle (avoiding using the phrase "complete series" just in case the series ever gets renewed.) For the backcover I found some official background art that worked really well with the layout. The sky and mountains hold the chunk of the blurb and preview images, the detail in the hills get a little room with and EXTRAS box to the side and some information bellow it, and the final disc information on the foot and by the flowers. The background also really worked well when wraped around the spine, and the colours are quite coherent with the front cover. I did alter the corner of the sky a little bit so it blended in better with the sky on the front cover. Other than the low quality of the front cover, I really like how the cover came out.
I did have an inside cover planned, which was just a simple image of background art, but I didn't get that printed in the end.
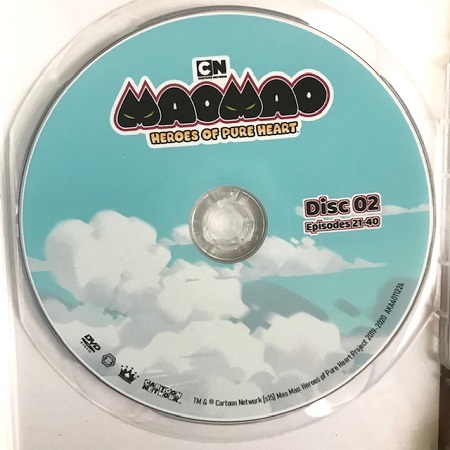
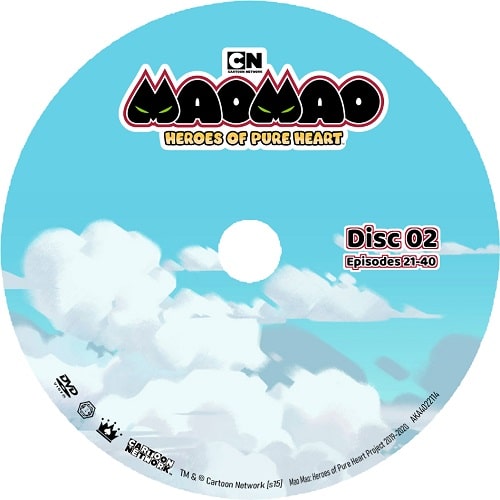 Part 3: Disc Art. Again, I found some more official background art, this time art of the sky. Again, it ties in well with the very light blue look from the cover, so I thought this would work fine. I plopped on the title image, and copied it's styling to add in Disc No. information. Then I added logos and finer details information on the rim of the disc. I was making this in Clip Studio Paint, which as far as I can tell, doesn't have a built in way to nicely wrap your text around or inside a circle, so I ended up using the warp tool for some not very clean looking results (but this issue would be resolved later.) I think the disc art design was simple, but pretty effective. I had both discs share the same design, just with different Disc No. information.
Finally, my designing process was done! Now all that was left was putting it all together. At least, I thought that was all that was left...
Chapter 4: Printing
I don't know what you might have were you live, but here, if you want printing done, you go to Officeworks, which is exactly where I went. Normally you go straight to the computers and get your stuff done there, but I wanted specific paper for this, with specific dimentions for it to be printed in, which meant having to go to the front desk. I hate having to talk to unfamiliar people and ask for help, but I wanted this done. The lady at the desk was nice. She had a book that contained the different kinds of paper they offered. I was able to go through them and find the one they use for dvd covers. I can't for the life of me remember what it was called. I'll need to take note of it next time.
I got her to print the specific dimentions, but for whatever reason, the printer was not having it for a reverse printed side. Rather than cause a ruckus, and just wanting to get things one and done, I decided to forgo the idea of having a reverse cover, and settled on just having it be one sided. And since I don't have a rotary cutter table at home, I asked her to cut it to size for me for a few extra cents.
Now here's where the silly thing comes in. Officeworks prints on a wide range of objects, not just paper. They can print on tshirts, and mugs, and all sorts of things. And they sell printable blank DVDs. With all of this information in mind, you would think they offer to print on DVDs. I asked the lady at the desk, and apparently this is not something they do. I believe she suggested some other places that might offer this service. Feeling a little defeated, I took my cover art, slipped it in the dvd case holding my blank, white DVDs inside it, and went back into my car. I'm pretty sure I tried ringing up the recommended places. I can't remember if I called up and they didn't pick up, or if they said they don't offer that service, or maybe I didn't end up ringing them at all and was just starring at the maps of the shop location. This was proving to be a much more complicated procedure than I had initially planned. So,
I bought myself a new printer. I was pretty sure I would stick with my DVD making hobby at this point, with how much fun I was having, so figured buying a DVD printer wasn't such a terrible idea, so long as it didn't hurt my wallet too much. I did a little google searching and eventually I found a printer was somewhat affordable that had dvd printing capabilities: the EPSON XP-6100.
I looked at the reviews and they seemed mostly happy with it. Checked some youtube videos and it looked ok and like it would do what I was wanting to do. And to my wonderful luck, I found the exact model I was after listed on the FaceBook Marketplace for about 40 AUD (this printer goes for about 160-200 AUD new), and just a few roads away from where I lived. While it was second hand, it looked like it hadn't been used much. Score!
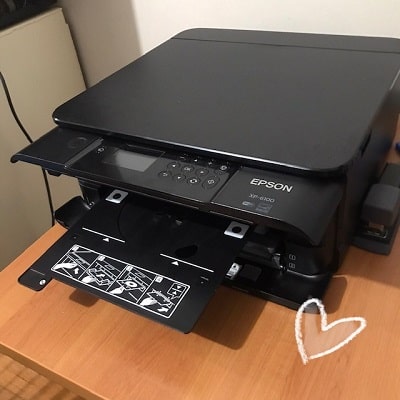 The in cartridges ended up costing just as much as the printer, however. Why is ink so expensive?? No matter. It was a bit of an investment, but I felt like I did pretty well in my bargain hunting, and I'm very happy to have my little Epson printer.
I set it up, and finally got to printing out my disc art. Epson comes with a couple different programs, along with it's own dvd printing program. It's somewhat basic, but a really nice thing it offers is the ability to write wrapped text that goes around the border of the disc <3 The ugly warped CSP text was no longer an issue! I removed the text from the image and reapplied it in the epson disc printing program, made sure the dimetions were correct, and hit print. The quality came out better than I was expecting. It's still a tad fuzzy, but it still looks official-passable.
And with that, my first homemade DVD was complete! And for a first attempt, I was pretty happy with how it came out. It was quite the journey, but it was fun. I enjoyed being able to do something creative again. But while this journey had a few bumps in the road, it was nothing compared to what would ail me in my next project...
Hosted by NeoCities. Created 2023.
